It's been a few weeks since I linked up with Sharon at Pintangle, to show works in progress. This isn't because I've been idle, but there hasn't really been a lot to show. I seem to be at that point in several projects where you simply get on with them and wallow in the meditative process of doing repetitive actions.
But there has been progress…
I found the perfect backing for my white quilt, a creamy cotton batik, which you can see at the top of the above photo. It was love at first sight and I think the texture is far more suited to this quilt than a Liberty lawn, which was my initial preference–the batik is more pocket friendly too! Now that the layers are basted together, I can get on with the quilting (such as it is). The original plan was to hand tie this quilt, but I've changed my mind and have decided to embroider little stars instead at each junction of the patchwork. That's a lot of stars!
Meanwhile, I've been working on my log cabin cushions and the second lot of blocks are half way done. As I've said before, I love the portability of EPP, so when these blocks are complete, I'll definitely be starting on something else.
Elizabeth,
x.
PS: There'll be more to follow on the fabric bomb idea–I hadn't forgotten, just working out a few details.
Showing posts with label Quilting and stitching. Show all posts
Wednesday, 28 May 2014
Thursday, 1 May 2014
Tumbling blocks…
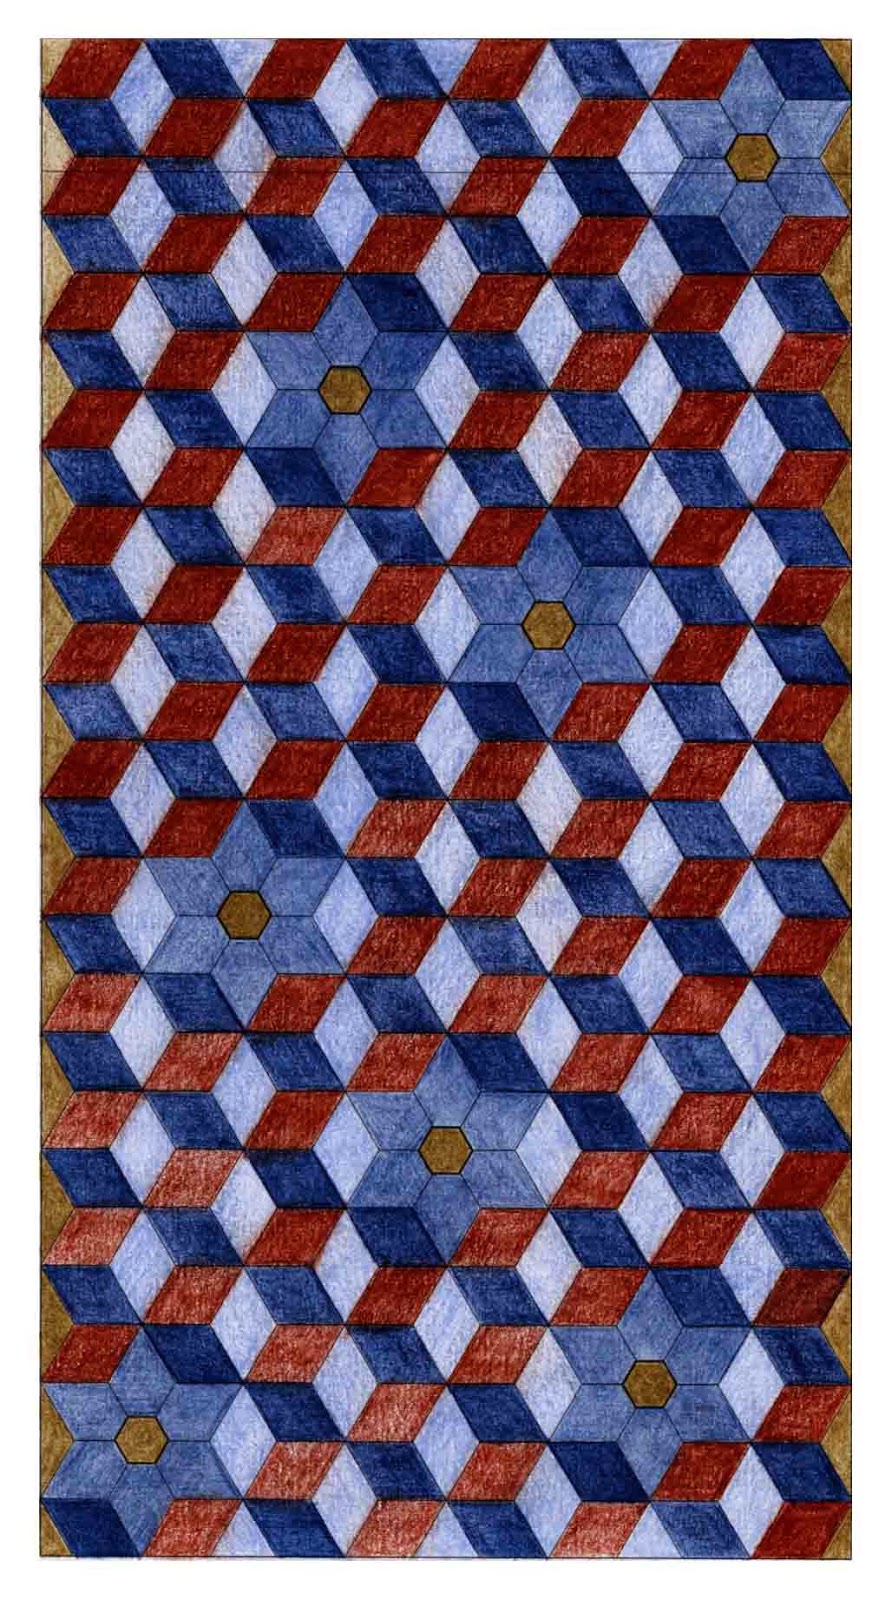
The perfect* backing for my white quilt continues to elude me, so I've started two other projects, both of which involve English paper piecing. I've wanted to do some more EPP for a while now as I really enjoyed making the hexagon strip for my white quilt. After all the recent freestyle embroidery, I felt it was time to do something traditional (with a few twists, of course) that requires disciplines such as measuring and planning rather than daydreaming and winging it.
One of the projects is a bolster cushion for our bed (more of which in another post), the other is a wall hanging made with Colourshott cottons. I am hideously late in arriving at the Colourshott party; the excuse for my tardiness is that I couldn't see what all the fuss was about. Being one of life's skeptics, quite simply, I didn't believe the hype (I'm far less curmudgeonly in other areas of life, in fact I'd go as far to say I'm quite trusting and cheerful). After purchasing the sample swatch books however, I can see I was wrong. Colourshott is just as fabulous as everyone claims!
So fabulous in fact that I've shelved my original plan for the wall hanging to be made from indigo dyed fabrics with metallic accents and am going for something much lighter and softer instead, (it was to see if the Colourshott range included a suitably metallic looking fabric that eventually persuaded me to try them). I still like the idea of using indigo dyed fabrics in an EPP project, but I can see now that including them in a wall hanging that also features an optical illusion might have looked a bit too 1970s hippyish–the kind of thing you might hang along side your Dark Side of the Moon poster. As I really would prefer something calming and contemporary, I'm hoping that the slight iridescence of Colourshott will work well with the tumbling blocks pattern and subtly enhance the optical illusion rather than induce dizziness and headaches in anyone looking at the final result.
Even when colouring in the designs by hand, with the original indigo scheme in mind, I could still happily while away the hours. All of which tells me this is either going to be the most absorbing project to sew, or, I'm a terrible procrastinator!
Elizabeth,
x.
* Actually, I thought I had found the perfect Liberty Tana Lawn backing, but when I calculated the cost, it worked out at over £100! So, not so perfect after all, this could be a very long wait.
One of the projects is a bolster cushion for our bed (more of which in another post), the other is a wall hanging made with Colourshott cottons. I am hideously late in arriving at the Colourshott party; the excuse for my tardiness is that I couldn't see what all the fuss was about. Being one of life's skeptics, quite simply, I didn't believe the hype (I'm far less curmudgeonly in other areas of life, in fact I'd go as far to say I'm quite trusting and cheerful). After purchasing the sample swatch books however, I can see I was wrong. Colourshott is just as fabulous as everyone claims!
So fabulous in fact that I've shelved my original plan for the wall hanging to be made from indigo dyed fabrics with metallic accents and am going for something much lighter and softer instead, (it was to see if the Colourshott range included a suitably metallic looking fabric that eventually persuaded me to try them). I still like the idea of using indigo dyed fabrics in an EPP project, but I can see now that including them in a wall hanging that also features an optical illusion might have looked a bit too 1970s hippyish–the kind of thing you might hang along side your Dark Side of the Moon poster. As I really would prefer something calming and contemporary, I'm hoping that the slight iridescence of Colourshott will work well with the tumbling blocks pattern and subtly enhance the optical illusion rather than induce dizziness and headaches in anyone looking at the final result.
![]() |
| Like the colours, but the arrangement still needs work. |
Above, is my favourite colour combination so far, it uses fabrics from the Impressions and Italy range of fabrics. I'm having so much fun playing around with options in Photoshop though, that I could easily spend the next 6 months producing slight variations on the same theme, without actually making a decision, let alone getting around to ordering the fabric.
![]() |
| Not so keen on these colours, besides, the design is off balance. |
![]() |
| How it might have looked– indigos, russet and metallics. |
Elizabeth,
x.
* Actually, I thought I had found the perfect Liberty Tana Lawn backing, but when I calculated the cost, it worked out at over £100! So, not so perfect after all, this could be a very long wait.
Friday, 28 February 2014
Mrs Wishy-Washy…
Recently, work has been full throttle and foot to the floor, so I haven't had as much time as last year for making and blogging about making.
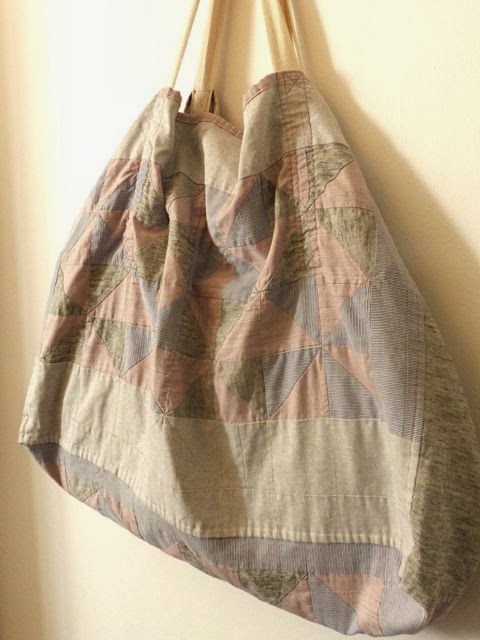
Of course, some making does get done, but it's of the necessary rather than frivolously pleasurable and playful kind. One such necessary make has been this pinwheels laundry bag, made from various linens and and a couple of old shirts I managed to persuade Patrick he no longer needs. Since our washing machine broke we decided to take advantage of the on-site launderette in our block of flats. The absence of a machine rattling away in the kitchen, damp clothing draped over makeshift driers, and disputes about whose turn it is to do the laundry/put things away, has been such a pleasant surprise that we've decided not to bother replacing our old machine. However washing our dirty linen in public can be embarrassing, and I certainly don't want our neighbours getting a peek at my smalls through transparent Sainsbury's carrier bags (I suspect they're not too keen on seeing them either).
So this bag needed making fast! It needed to be strong as well as light and roomy enough to take a full load of washing without weighing a ton. The result is a floppy shopper, but it does the job perfectly, although I need to add another, stronger, set of handles–something like upholstery webbing would work well.
For those who don't already know, Mrs Wishy-Washy is a character from a children's storybook by Joy Cowley. Now that I have my laundry bag, I feel compelled, as a matter of necessity, to make a Mrs Wishy-Washy apron and headscarf too, if I do, I'll be the chicest laundress on the block!
Elizabeth,
x.
PS: Mrs Wishy-Washy is not to be confused with Wishy-Washy, the dim-witted brother of Aladin (we're talking the pantomime version here). Their mother is Widow Twankey, who is in fact a washerwoman with a fondness for innuendo and outlandish costumes. I doubt very much that Mrs Wishy-Washy would have approved of her.
Wednesday, 5 February 2014
WIP Wednesday
Linking up with Sharon at Pintangle for WIP Wednesday. This may only be my second time linking up, but already I'm beginning to suspect this is a great motivator for progressing projects. I've already made more progress on this block in a week than I would usually achieve in two!
Procrastination does have its upside though since I much prefer to be in the middle of something rather than the beginning or end, and now that this block is finished, I'm forced to move onto the next. Bubbling away in my noodle is the thought that I should let the fabric take centre stage for a change. There will still be plenty of stitching but I think the texture should come from how I play with the fabric–that's the plan anyway!
I also need to lay everything out and see how the quilt is shaping up as a whole, rather than simply looking at it in fragments. I hope I like what I see!
Elizabeth,
x.
Wednesday, 29 January 2014
WIP or WIGSP…
For the first time, I'm linking up to Sharon at Pintangle, and her Work in Progress Wednesdays (although Work in Glacially Slow Progress would be more apt for my white quilt).
It's a great way to celebrate even the tiniest amount of progress, and can motivate us to pick up unfinished projects that have been languishing at the back of cupboards and bottom of sewing bags. I've decided to join in as it might help me inch along my white quilt, which is often pushed to one side, in favour of quicker fabric fixes.
However, this block has progressed somewhat since I last showed it; now 15 of the 24 squares in the grid have been worked. More of the rust dyed backing fabric has been revealed where I've snipped away some of the scrim, but I think I should be bolder and cut away even more–what do you think?
Sharon's blog includes some fantastic tutorials, while her dictionary of stitches is mind-bogglingly extensive–so well worth a visit!
Elizabeth,
x.
PS: Apologies for the gloomy photographs, it's very grey outside!
Monday, 27 January 2014
Pinwheels…
A surge of Spring cleaning madness and general home titivation has overcome us. Sainsbury's bags for life no longer cut it as laundry bags, so I decided we needed something a little more stylish. Here's the front of our new laundry bag–it's going to be big, and will need to be sturdy, thankfully, it's coming together pretty quickly. Only a few hours of cutting and sewing, followed by a little bit of stretching and pinning, and the top was ready for quilting. Although small enough to quilt on the machine without need for bicycle clips to keep rolls of excess fabric a little more manageable, I'm going to quilt it by hand instead. Afterall, it's cold outside and hand quilting will keep my lap lovely and warm.
By the way, has anyone else joined in with the RSPB's great British garden birdwatch? As a would be twitcher, I love nothing more than looking out for feathered creatures (birds of prey are my favourite, but you don't get many of those in Southeast London). All week long, Blue tits, Long-tailed tits, Great tits, a Robin and a blackbird could be seen pecking at the feeders on the lavender bush outside my studio window. At the back of the flat, a Green Woodpecker visited on an almost daily basis, while Parakeets that nest in the neighbouring park are regularly sweeping past. But come the hour of the intended watch & record, not a bird was to be seen–not even a pigeon–typical!
I'm debating how to fill in my form: tell the truth, or 'embellish' it.
Elizabeth,
x.
Tuesday, 21 January 2014
Threaditation…
Galvanised by all your lovely comments I got cracking on the next block for my white quilt. Again, this will be another slow burn, something I've no intention of rushing–a kind of 'thread meditation' as Queenie so aptly puts it–or threaditation as it could also be shortened to. Queenie's phrase perfectly describes how I feel about hand sewing, for me, freestyle embroidery is the ideal combination of quietness, thoughtfulness and creativity, while at the same time producing something I'll hopefully treasure.
I have to admit that I'm hopeless when it comes to attracting feedback (and leaving comments for that matter: alas well intended efforts have occasionally resulted in the wrong comment ending up on the wrong blog–doh). So instead I've come to see this blog as more of an online journal filled with makes and musings and not concern myself with stats–it's much safer that way! I accepted long ago that I'll never be an internet sensation, so any feedback (as long as it's not from online casinos and the like) is always gratefully appreciated.
Anyhow, back to the block. Over Christmas I did a little more rust dyeing. I experimented with various combinations of vinegar (white and red) lime juice, lemon juice and even apple, hoping for different effects. On some fabrics I used copper wire, on others steel wire as well as screws and paper clips. And the results…well, all pretty much the same although the white vinegar and copper wire did produce a very subtle greenish tinge, which was totally lost when I rinsed the fabric through. How come that never happens when I try to remove unwanted stains, why do they stay stubbornly in place?
I'm using one of the stronger pieces as a backing to some drawn and cut thread embroidery. My first challenge has been trying to photograph it in such a way that both the backing fabric and the scrim-like fabric are visible and don't merge into a muddy oneness.
![]() |
| It's a WIP, there's still lots of tidying up to do. |
![]() |
| Groovy baby! A 70s style effect produced by placing the embroidery hoop over a table lamp. |
The second, will be knowing when to stop, when to stop drawing the threads together and cutting away bits of fabric before the entire thing falls to pieces!
Elizabeth,
x.
Monday, 13 January 2014
A little bit of stitchery
I do like to have a slow project on the go, something that seems to have no end in sight and changes as I work on it. Intentional slowness, and changing the brief as takes my fancy are the antithesis of daily life which is all about schedules, deadlines and delivering what was agreed. I'm certainly not complaining–I like structure–but sometimes it's nice just to meander through the stitches, and freestyle embroidery is the perfect opportunity for that!
x
Monday, 4 November 2013
White quilt–pollen
Here's another block I'm working on for my white quilt. It reminds me of pollen and seedlings floating on the breeze–not sure if that's a good image, or if it just makes my nose itch! I've used scraps of old lace, bits of muslin and a very thin and worn piece of linen for the background. The yo-yos are stuffed to give the block more relief and texture.
The rest of the background will be made up of kantha, french knots and bullion stitches. That's a lot of stitching, so if it starts to look a bit stitch heavy, I'll add more snippets of lace.
Elizabeth,
x.
Tuesday, 22 October 2013
White Quilt–some progress
It's two steps forward, one step back on my white quilt. I've completed one block, nearly finished a second, and I'm happy with both. However, as much as I liked the block below when first made, I've since realised that it can't be used as it's just too heavy! It weighs as much as the EPP strip of hexagons and the other blocks combined. I imagine, that if this block did make its way into the quilt, it would create a black hole effect–it's great weight dragging everything towards its centre! So, this block will just have to go in the samples book, or be used in another project, at another time.
Here are the ones that will make it into the quilt though…
This one is a vintage handkerchief which had a very pretty lace border. I folded the border in, added a few off-cuts of lace from vintage collars, then a little bit of embroidery.
This is a work in progress and I'm having great fun with it. The larger paisley motif, is made from a child's nightdress. The central circle is stuffed from behind (trapunto) to create a mound, which I've covered in chain stitch. Then, apart from a ribbed wheel for the smaller paisley, the rest of the stitching is good old Kantha. I do love running stitch!
Elizabeth,
x.
Here are the ones that will make it into the quilt though…
This one is a vintage handkerchief which had a very pretty lace border. I folded the border in, added a few off-cuts of lace from vintage collars, then a little bit of embroidery.
This is a work in progress and I'm having great fun with it. The larger paisley motif, is made from a child's nightdress. The central circle is stuffed from behind (trapunto) to create a mound, which I've covered in chain stitch. Then, apart from a ribbed wheel for the smaller paisley, the rest of the stitching is good old Kantha. I do love running stitch!
Elizabeth,
x.
Wednesday, 16 October 2013
Mitering inner corners and being obtuse…
Recently, I was asked to make a sewing machine cover. Simples I thought, it's essentially five rectangles, one of which needs an opening for the handle. So simple in fact that I decided to add a zipped pocket, and some binding to the handle opening. Well, the zip went without a hitch, but crikey, my brain hurt after over an hour spent fruitlessly trying to work out how to miter inner corners!
My ego was fairly bruised too because I love making binding and consider it to be one of the few sewing tasks I actually do properly (is it perverse that this is almost my favourite thing to do–a bit like preferring the icing to the cake itself?). Still I wasn't going to let a bit of fabric get the better of me, so after a lot of experimentation–and unsuccessful web searches–I finally worked out how to bind and miter inner corners.
Of course, you're probably all thinking, what's the big deal, any fool knows how to do that! But just in case you don't, here's how it's done…
My ego was fairly bruised too because I love making binding and consider it to be one of the few sewing tasks I actually do properly (is it perverse that this is almost my favourite thing to do–a bit like preferring the icing to the cake itself?). Still I wasn't going to let a bit of fabric get the better of me, so after a lot of experimentation–and unsuccessful web searches–I finally worked out how to bind and miter inner corners.
Of course, you're probably all thinking, what's the big deal, any fool knows how to do that! But just in case you don't, here's how it's done…
Starting at the outer corner, draw a diagonal line in towards the central fold of your binding, it is important that the angle of the line is exactly 45 degrees. Snip to where the line meets the fold.
Flip the binding over and fold in the loose ends as shown above–the arrow shape should form a perfect right angle. Pin and press in place.
Flip the binding tape back over and press shut. What you should now have is an obtuse angle that starts on the fold and extends out to the binding's edge. Repeat this on each end of your bindings. Remember to allow for the amount that is taken up by the angle when calculating the overall length of your bindings.
Pin bindings in place (look at that lovely join) and sew in place. Unfortunately, I can't show you the sewn version as my machine is still kaput–but trust me this works!
The key is to remember that the angle is obtuse–which is pretty much how I felt when I just couldn't fathom how to miter inner corners!
Elizabeth,
x.
PS: The 45 degree angle only applies to square, or rectangular openings, triangles, hexagons etc would be different.
Monday, 16 September 2013
Finishes and half finishes
Linking up with Catherine at Knotted Cotton to celebrate slow bloggers everywhere.
The last month or so has been all about quilts. A chevron quilt made to order, plus a little more rust dyeing and shisha mirror work for my white quilt. Two half-finished makes include some fingerless mitts – still on their sticks, and a skirt, which really is taking far too long to complete!
What have you been working on?
Elizabeth,
x.
![]() |
| top left: a chevron quilt made to order top right: some rust dyeing and shisha work for my white quilt bottom row: mitts on sticks, binding and a half-finished skirt |
The last month or so has been all about quilts. A chevron quilt made to order, plus a little more rust dyeing and shisha mirror work for my white quilt. Two half-finished makes include some fingerless mitts – still on their sticks, and a skirt, which really is taking far too long to complete!
What have you been working on?
Elizabeth,
x.
Friday, 16 August 2013
Rust dyeing
During a break from quilting to order, I've played around with something a little more personal instead. I've been meaning to do some rust dyeing for ages, after all, it doesn't require much in the way of equipment, it's easy and safe, and can be done on any scale*. Simply fold, wrap, sew or twist your fabric around bits of metal (old keys, paper clips, screws–virtually everything works), put them in a bowl filled 50/50 with water and vinegar–and wait…
After several hours, I removed the bundle, then left it in the air to dry for the oxidization process to take place. Much to my delight, and Patrick's consternation (he told me the screws wouldn't rust as they were stainless steel) my piece of plain white linen was transformed in to a patterned fabric.
I like the almost Shibori effect, which was achieved by wrapping wire and string around the screws. And since I don't really have the facilities, or space at home, to do indigo dyeing, rust dyeing may well satisfy my need to personalise cloth before it is sewn into, until I find another local indigo dyeing workshop. I'm going to play around with other acidic solutions, maybe by using white vinegar or lemon juice instead of red wine vinegar, it would also be interesting to see how the technique works on different fabrics such as silk or netting. Substituting steel or iron for copper could also be interesting–perhaps the result would be a verdigris effect?
I've added a few shisha mirrors, for a bit of sparkle. I hope that by embroidering around them with white threads, this piece might just find its way into my white quilt, if not, I'm sure I'll find a use for it elsewhere.
Elizabeth,
x.
* I think this would be a perfect way to keep kids entertained during the holidays, there are no dangerous chemicals, it's fun, and best of all they see science taking place before their very eyes!
![]() |
| A solution of water and red wine vinegar, plus a bundle of cloth and screws. |
After several hours, I removed the bundle, then left it in the air to dry for the oxidization process to take place. Much to my delight, and Patrick's consternation (he told me the screws wouldn't rust as they were stainless steel) my piece of plain white linen was transformed in to a patterned fabric.
![]() |
| Stainless steel will rust! |
I like the almost Shibori effect, which was achieved by wrapping wire and string around the screws. And since I don't really have the facilities, or space at home, to do indigo dyeing, rust dyeing may well satisfy my need to personalise cloth before it is sewn into, until I find another local indigo dyeing workshop. I'm going to play around with other acidic solutions, maybe by using white vinegar or lemon juice instead of red wine vinegar, it would also be interesting to see how the technique works on different fabrics such as silk or netting. Substituting steel or iron for copper could also be interesting–perhaps the result would be a verdigris effect?
![]() |
| A little bit of shisha work to brighten the fabric. |
![]() |
| I love this impression left by a screw head. |
I've added a few shisha mirrors, for a bit of sparkle. I hope that by embroidering around them with white threads, this piece might just find its way into my white quilt, if not, I'm sure I'll find a use for it elsewhere.
Elizabeth,
x.
* I think this would be a perfect way to keep kids entertained during the holidays, there are no dangerous chemicals, it's fun, and best of all they see science taking place before their very eyes!
Monday, 12 August 2013
Quilting to order.
Quilting for pleasure is much more fun than quilting to a brief. The thing is – and this is probably a shooting myself in the foot type of confession for someone who's blog heavily features the word 'quilt', I hate quilting! I love patchwork, and adore quilting by hand, but faffing about with a machine, rolling up acres of fabric into bicycle clips, in order to feed a slightly less bulky tube of fabric through the gap in a sewing machine is not my idea of fun.
Thankfully, the quilting brief was straightforward, straight lines, done in the ditch (well, the lines are straight, and the majority of them are in the ditch). Had the brief been for free motion embroidery, intersecting circles, or the type of elaborate design that for some reason, always reminds me of a custard cream biscuit, I'd have wept, knowing full well that this was a challenge too far! That type of quilting wizardry is best left to those with long arm quilters, and machine skills that I'll never in a million years possess.
I am however, in possession of a new rotary cutter, and goodness me, I hadn't realised my old one was so blunt. This one slices through fabric like a hot knife through butter, whereas my old one usually needed a little after help from a pair of scissors. With another quilt to start and finish by mid September it's just as well my tools are now up to scratch. Bernie doesn't know what's hit him (I'm more of a Sunday driver when it comes to using the sewing machine) but he's loving the extra work-out and seems to thrive on a challenge.
I'm also getting a perverse kind of pleasure from quilting to someone else's deadline, while using their fabric and colour choices has certainly been good for me. I'm usually far too conservative, preferring restrained palettes, minimal patterns and linen or Japanese woven cloths whenever possible. I am missing the more leisurely pace of sewing for myself though, and the peaceful tones of my white quilt. So, perhaps a night or two off from quilting to order is called for, a few hours spent hand sewing is just what I need.
Elizabeth,
x.
Wednesday, 10 July 2013
WIP Wednesday: the White Quilt
I've been having fun, pleating, gathering, stitching, and pricking my thumbs in the process. Slowly, the over all look of this quilt is coming together in my mind's eye. The design will be simple, a band of hexagons, top and tailed with squares of varying sizes, surrounded by a reclaimed lace border. I'll add my own embroidery and pieces of fabric manipulation, eg, the above twisted pleats, but I also want to re-use bits from other textiles, such as the satin stitch embroidery in the above photo, as well as a monogram from an antique linen pillowcase in the photo below.
I was secretly trying to make my cluster of tiny Suffolk puffs resemble whelks and barnacles, so was thrilled, when without any prompting, Patrick said that's what they looked like (he earns serious brownie points for that!). This will eventually be one of the larger squares, but I want to finish it off with an outline of skinny strips of fabric, tightly packed together to suggest something like coral.
As you can see, my so-called 'White Quilt' isn't really white, a few colourful interlopers have made their way into the scheme. But I'm going to continue to call it the white quilt–the whitish-creamy-brownish quilt, doesn't have quite the same ring!
Elizabeth,
x.
Thursday, 27 June 2013
The longest journey…
starts with a pile of hexagons. I am probably the world's slowest quilter, possibly because I like to do as much as I can by hand, rather than machine. Machines tend to splutter and choke on thread, while needles can snap, fingers just get sore and need a little rest.
Time to cut more scraps.
Elizabeth,
x.
Monday, 17 June 2013
I think it's time I made a quilt…

I've got the quilting itch. Okay, maybe not for a conventional quilt, but still a quilt of sorts. I want it to feature: English paper pieced hexagons (my nod to tradition), kantha, drawn thread work, raw edges, hand tied elements, muslin and linen – lots of linen! I want as much of my quilt as possible to be made from existing textiles: pillow cases, napkins, nighties, monogrammed handkerchiefs, and anything else I can lay my mitts on. And I want it to be white, with only the teeniest flashes of colour (like the red telephone box against the snow in the above mood board). The moodboard is a collection of fragments from here and there: exhibits from last year's festival of quilts at the NEC, BooDilly's muslin patchwork–which I just love, some drawn thread work, a quire of deckle edged paper, snow, cracked ice, and a few bits of my own.
There, I've made my declaration, so I'd better make a start and put my words into action. As for the size, I haven't a clue, that's a detail for later, first I need to gather my materials.
Elizabeth,
x.
Monday, 10 June 2013
My little dumpling bag.
Less of a rigid gaming purse, more of a floppy sack, but I'm fond of it nevertheless and intend to use it for carrying sewing supplies when I'm on the go. More of these are on the cards, perhaps as gift bags filled with goodies. Or, maybe next time, I'll adapt my pattern and turn it into a shifuku (a bag for carrying tea caddies) which I have Queenie to thank for bringing to my attention. I might even make an azuma bag, as this would give a greater surface area for trying out more shashiko.
You see, I am, and always have been, something of a bag lady. While other women obsess over shoes, my passion is for handbags – and leather gloves, (is there anything more chic than a beautiful bag and glove combo?). Whatever I choose to make, one thing is for sure, it will feature more of these little flowers – they're so simple and sweet to make.
Elizabeth,
x.
Subscribe to:
Posts (Atom)